Overview
Contents
This is a tutorial on writing programs in ARM assembly with A64 Instruction set. Assembly language is highly useful in writing optimized code. Understanding assembly gives us an insight into how compilers work, details of pre-kernel boot environment internals and also helps in debugging code written in high-level languages.
Access the entire repository for programs in this tutorial here.
A64 Instruction Set
A64 instruction was a new addition for ARMv8 architecture. The best sources to get started on ARMv8 and A64 instruction set are :
ARM Compiler armasm Reference Guide
Above documents should always be handy while writing/reading ARM assembly programs.
Setup
Most of us are familiar with writing programs in high-level languages such as C, C++, Java. These languages abstract most of the assembly level instructions. Therefore, the assembly code may seem daunting at first. The easiest way to learn assembly programming is by writing programs in high-level language, compiling individual files into object files, and then using disassembler such as objdump to see assembly output of the written code.
As an example, consider a simple C function incrementer that takes an integer as argument and increments the integer.
void incrementer(int num)
{
        num++;
}
Make sure to install GNU compiler toolchain for AARCH64: gcc-aarch64-linux-gnu
To compile the C source file into object file, use the compiler as:
# aarch64-linux-gnu-gcc -c -O0 test.c
Remember to specify -O0 option to the compiler, which disables all compiler optimizations. As you noticed, the incrementer function is useless. It simply increments a local copy of the variable. Any self-respecting compiler should completely ignore the body of this function. But for our purpose, let us disable smartness of the compiler to analyze what literal translation of the code looks like.
Upon compilation, the compiler will generate the object file test.o. To disassemble this object file, use objdump as
# aarch64-linux-gnu-objdump -D test.o
objdump generates a section-by-section disassembly of the source. For now, we are only interested in .text section, where the code the function incrementer() resides:
Disassembly of section .text:

0000000000000000 :
   0:	d10043ff 	sub	sp, sp, #0x10
   4:	b9000fe0 	str	w0, [sp, #12]
   8:	b9400fe0 	ldr	w0, [sp, #12]
   c:	11000400 	add	w0, w0, #0x1
  10:	b9000fe0 	str	w0, [sp, #12]
  14:	d503201f 	nop
  18:	910043ff 	add	sp, sp, #0x10
  1c:	d65f03c0 	ret
The leftmost column is the address of each instruction, the second column denotes the opcode, the third column is the mnemonic of the instruction, and the last column denotes the operands of the instructions.
Now, let us analyze what the assembly instructions mean by comparing them to C source.
At the start of the function, the first step is always to setup the stack frame for local variables and arguments. Since the stack grows ‘downward’, we subtract 16 (0x10) to setup the stack frame for current function. Note that ARM requires that stack be aligned to 16 byte boundary. In this case, 16 (0x10), should be sufficient to store all local variables and arguments of the function.
sub sp, sp, #0x10
Next, we store the arguments passed to the function on the stack. By ARM convention, the arguments passed to a function starting from register X0. We store the value in Register W0 (lower half of the 64-bit X0) register to offset of stack pointer [sp, #12].
str w0, [sp, #12]
Now that we have function setup, let us move to the actual body of the function.Remember that ARM is a load-store architecture. Since we stored the argument integer ‘num’ on stack, to perform any operation on ‘num’, we must first load the number from the stack to CPU register. After loading ‘num’ to x0[w0] register, we can then increment the number and store the new value back to the original location of ‘num’ on the stack.
ldr w0, [sp, #12]
add w0, w0, #0x1
str w0, [sp, #12]
This store, load, store of the same number may look redundant, because it is. An optimizing compiler will instead keep the value in X0 register for the entire duration of the function.
Now that we are done with body of the function, it is time to return. But first, we should restore the stack pointer to its original location, that is, where it was before calling the function.
add sp, sp, #0x10
Last instruction is fairly straight-forward:
ret
We want to return from the function. The ret instruction uses the value in Link Reigster (X29) as return address and simply branches to the address in that register. This will mark the exit of the function.
Now that we know the basics of assembly programming, let us setup a driver program in C that makes calls to assembly routines so we can test our implementation.
Test Program
To simplify testing, we will write test assembly functions as functions called from other C functions. This way, we do not need to worry about program setup code. All of the assembly functions will be written in separate .S files (.S is a convention for assembly source files)
To start with, here is short program to test bit clear operation (BIC) in
extern int __bit_clear();
void test_bit_clear()
{
	int i = 0xd36F;
	int bit = (1 << 1);

	printf("\n\nTest bit clear:\n\n");
	printf("i before bit clear =  0x%x\n", i);
	printf("===BEGIN ASM===\n");

	i = __bit_clear(i, bit);

	printf("===END ASM===\n");
	printf("i after bit clear = 0x%x\n", i);
}

int main()
{
	printf("Arm assembly test...\n");

	/* Basic Assembly Testing */
        test_bit_clear();
}
The C function makes a call to assembly function __bit_clear that is defined in a separate .S file: test_bit_ops.S
Similarly, we will define all the test functions in this .C file, and all assembly functions in .S files.
Bitwise Operations
Let us implement the actual assembly function __bit_clear. Note that __bit_clear should be declared as .globl so that linker can find the link the function during program linking stage.
So far, we have avoided using any optimizations. For simple functions that only operate on a few variables, argument optimization can be done: i.e arguments can be processed in registers without ever of loading and storing it from function’s stack frame.
Remember from our discussion in the introduction section that register X0-X7 are argument registers.
In this example, the argument ‘i’ is passed through X0 and argument ‘bit’ is passed through register X1.
Bit clear (BIC) operation can then be performed on ‘i’ as:
__bit_clear:
	BIC x0, x0, x1     // CLEAR - clear bits in x0, as specified in x1
	RET
And on executing ‘RET’ instruction, the control is transferred back to the C function bit_clear, with return value in x0.
Similarly, other bit operations can be performed in following manner:
__bit_set:
	ORR x0, x0, x1     // SET - set bits in x0, as given by x1
	RET

__bit_toggle:
	EOR x0, x0, x1     // EXOR - toggle bits in x0, as given x1
	RET

__bit_complement:
	MVN x0, x0 	   // NOT - perform bitwise NOT on x0 and store in x0
	RET
Function calls
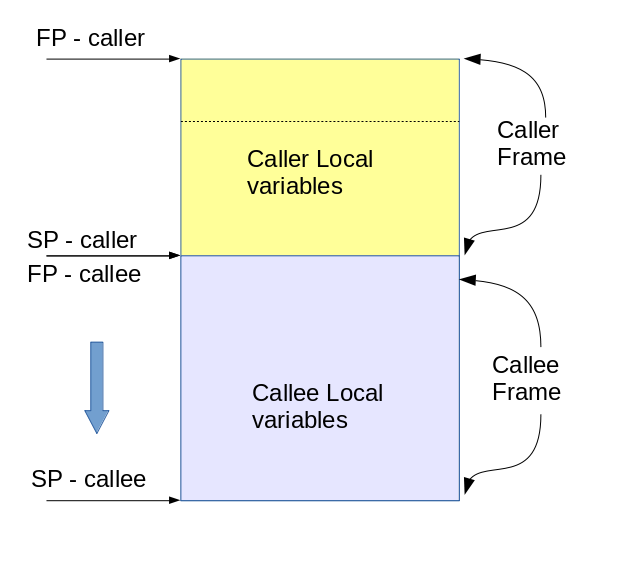
So far, we have seen assembly functions that do not make calls to other functions. These are also called leaf functions. Now let us see what a non-leaf function assembly looks like. To understand this, we must understand function stack frame in detail.
Consider a simple example where a function caller makes a call to another function callee(). callee() is a leaf function and caller() is non-leaf function:
int callee(int arg)
{
      return arg + 13;
}

void caller()
{
      int num;
      num = callee();
}
LR (x30) – Link Register – stores the address of return address – for caller(), this address is the return address of the instruction in caller()’s parent function.
Since the callee function will have it’s own SP, FP and LR, the caller function must preserve these registers – on it’s own stack before invoking callee().
Body of callee() is straightforward, as it is a leaf function. Since it does not make a call to other functions, it does need to store FP or LR in stack. After the body of the function is executed, callee() can return to caller() using address in LR – the return address in caller().
After returning to caller(), rest of the body in caller() is executed. Note that at this point, FP and LR still hold the values of callee() function.
The final step then is the reverse of what we did earlier – restore FP and LR. This way, the caller() function can return to it’s parent by branching to address in LR.
__func_setup_callee:
	SUB SP, SP, #16       // SP Aligned to 16-byte boundary
	STR x0, [SP, #8]      // store arg
	LDR x0, [SP, #8]      // load arg
	ADD x0, x0, #13       // add 13 to arg
	STR x0, [SP, #8]      // store arg
	LDR x0, [SP, #8]      // load arg
	ADD SP, SP, #16
	RET

__func_setup:
	STP x29, x30, [SP, #-32]!   // store FP & LR
	MOV x29, SP
	STR x0, [x29, #28]          // save arg variable
	LDR x0, [x29, #28]          // load arg variable for passing argument
	BL __func_setup_callee      // branch
	STR x0, [x29, #28]          // save return value to arg
	LDR   x0, [x29, #28]        // load arg to return
	LDP x29, x30, [SP], #32     // restore FP & LR
	RET
Unconditional and Conditional Branching
Branch instructions modify the instruction pointer to jump to another address: this is achieved in high-level languages with ‘goto’, if-else statements and loops.
AARCH64 provides branch family of instructions (B, BL, BLR) that modify the instruction pointer to point to a different address
Unconditional branching is achieved in C with the use ‘goto’ keyword. In assembly, this is implemented with ‘B’ branch instruction:
Consider an example of ‘goto’ in C:
int test_goto(int i)
{
	goto done:
	i += 2;
 done:
	i = 10;
}
Now, let us see the assembly code. We have already established function call and stack setup in previous examples, so let us jump directly to ‘goto’ code.
__goto:
        B set_10
	ADD x0, x0, #2
set_10:
	MOV x0, #10
	RET
The first instruction is branch (B) instruction.
The format of ‘B’ instruction is :
B <Label>
The ‘label’ is an absolute/relative address in the program. In this case, the assembler replaces ‘label’ with the address of the instruction.
In this example, the label ‘set_10’ is written purely for convenience. The label is actually the address of instruction ‘MOV x0, #10’. The processor jumps to the address using on with branch instruction. To view this address, use objdump utility on the generated obj file.
‘goto’, however, is rarely used in a high-level programming language like C. More common is the use of conditional branching with ‘if-else’ statements, e.g:
int test_if_else(int i)
{
    if (i < 10)
        i = 1;
    else
        i = 0;
    return i;
}
The conditions are tested with ‘B.cond’ instructions, where the conditions are evaluated based on outcomes of previous instructions.
The outcomes are stored in flags: for AARCH64, this is the PSTATE register.
PSTATE register stores various flags denoting the outcome of conditions:
N Negative result (N flag).
Z Zero result (Z) flag.
C Carry out (C flag).
V Overflow (V flag)
The assembly code generated is as follows:
__test_if_else:
   CMP x0, #10           // compare input with 10
   B.gt false_if_else    // take the 'else' path (not less that 10)
   MOV x0, #1            // prepare return 1
   B done_if_else
false_if_else:
   MOV x0, #0            // prepare return 0
done_if_else:
   RET
CMP (Compare) instruction updates the flags inf PSTATE. In this example, the condition branch instruction B.gt checks B.gt
As you can see, the ‘if/else’ conditions are ‘conditional branch’ instructions – That’s right – ‘if/else’ is implemented at assembly level as a set of “evil” goto statements!
Similarly, other comparison conditions (<, >, <=, >=, !) are implemented by checking different flags, and branching based on the result.
Loops
In this section, we will take a look at one of the most common language constructs – loops: while, for and do-while.
Although each loop behaves differently, implementation of all loops is very similar. Hence, we will only discuss ‘do while‘ loop here.
Refer to other examples for while and for loops.
Consider a simple do-while loop:
int test_do_while_loop(int i)
{
    do {
        i++;
    } while (i < 10);
    return i;
}
The assembly version looks as follows:
_do_while_loop:
    ADD x0, x0, #1            // add 1
    CMP x0, #9                // check if less than 10
    B.le __do_while_loop      // loop while less than 10
    RET
In this case, the body of the loop executes at lease once, which is expected of a do while loop. After the first execution, the condition is tested as discussed in ‘conditional branching‘ section, and if the condition is false, we simply return to label ‘_do_while_loop‘ – which is the address of the first instruction in the body of the loop.
Coming soon…
pointers, arrays… see the code